ST USES IBM DISK FILES
Connect a 5 1/4-inch disk drive
by DAVID SMALL
You can read and write IBM PC disks on your Atari ST--if you connect a 40-track, 5 1/4-inch disk drive to your 3 1/4-inch disk drive.
That's right, you could generate a data or text file at home on your ST, take the disk to work and use directly with an IBM PC.
Are you a commercial ST programmer doing your development work on the IBM? (That's the approved method.) With this hookup, you could move files directly into the ST from an IBM disk. It's a lot faster than fooling around with the serial bus and KERMIT.
Or...if you don't need IBM file compatibility for your ST, you can connect a double-sided, 80-track, 5 1/4-inch drive and store 720K on a single disk.
This will save you money because 5 1/4-inch disks and drives are cheaper than 3 1/2-inch disks and drives. Atari is currently charging ST owners $199 for a single sided (SS) drive and $349 for a double sided (DS) drive.
Shopping carefully, you can pick up industry-standard 5 1/2-inch drives for under $150, complete with case and power supply.
But can you use the disk drive from your 8-bit Atari? Not if the drive is an 810, 1050, or an Atari workalike such as an Indus, Astra, or Rana. However, ATR8000 and Percom drives will work because they are "industry standard" drives that communicate via a standard 34-pin interlace connector. Most drives for the 8-bit Ataris don't use this connector, therefore the ST will not be able to work with them.

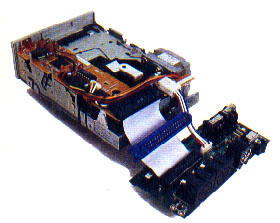
Figure 1: A 40-pin clamp-on connector creates a "tap" when attached to the 34-pin standard ribbon cable within the ST drive.
THE WARNING
Before actually telling you how to hook up a 5 1/4-inch drive to your ST, we must caution you this is no project for electronics beginners.
While most of the work is mechanical (clamping connectors together, etc.) there is some soldering required. You also need to be familiar with the circuitry of whatever 5 1/4-inch you are using. And debugging your new system can be a frustrating experience.
Not only that, if you open up your ST drive as explained in this article, you'll violate the warranty. Probably you also will not be able to get the drive casing back on unless you cut a slot in it for the added ribbon cable.
'Nuff said, let's plunge ahead.
WHICH DRIVE?
The 5 1/4-inch drive you add can be either 40-track (for IBM compatibility) or 80-track (for more memory and greater ST compatibility). You can also choose between either a single-sided or a double-sided 5 1/4-inch drive.
I recommend a double-sided drive. There's no good reason to go through the trouble of giving your ST a single-sided 5 1/4-inch drive--unless you have already have one sitting on a shelf and are low on money. Anyway, IBM disks are usually double-sided. Incidentally, ST hardware is set up to handle only two drives. Atari owners are used to a maximum of four drives, but there is just no way to run more than two drives on the ST.

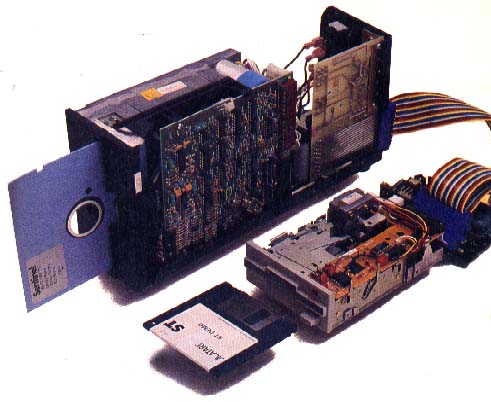
"Then I plugged the two DB-40s together... and I had my signals. Quick and easy." Figure 2
RIBBONS AND PIN
The standard disk drive connection is either a 34-pin connector in a male/female arrangement, or an edge connector with two rows of 17 pins. In the world of standard disk drives, it is most standard to see a 34-pin ribbon cable with edge connectors clamped onto either end.
Of the 34 pins in the standard industry connector, only about 14 are really used. The Atari ST brings these 14 wires out in a short, thick cable that plugs from the ST into the first disk drive's IN connector. This cable uses a non-standard 14-pin DIN connector, but it carries industry standard signals.
Our goal is to get those signals to a standard 34-pin connector and thus to a standard disk drive.
Why did Atari choose a strange 14-pin connector? Probably two reasons. First, it's been my experience that ribbon cable connectors don't handle abuse well. They fail in a frustrating, intermittent manner--which spells expense for Atari. Second, ribbon cables make wonderful broadcasting antennas, and the ST had to pass tough FCC tests. The present DIN-connector cables are tough and easily shielded.
Now, theoretically we could put a 34-pin edge connector on one end of a ribbon cable, a 14-pin DIN connector on the other end, and we'd have our disk drive cable. However, in practice I couldn't find a 14-pin DIN connector.
I tried hard. I checked the local Radio Shacks, electronic supply distributors, and so on. No one had even heard of a 14-pin DIN connector. Looks like another first for Atari. Right now, the only way I can think of to get this connector would be to order one from Atari . . .and they don't sell the cable as a spare part. Maybe later.
INSIDE THE DRIVE
Therefore, the method I needed to use was to tap directly into the signals inside the 3 1/2-inch ST drive. As we already warned you, this voids your warranty and will probably require you to cut a slot in the drive casing for the new ribbon cable.
If you open up the drive (use a phillips-head screwdriver and a little patience), you'll find that the 14-pin DIN connector expands to (Surprise!) an industry-standard 34-pin ribbon cable.
Of course, it does this inside the shielding to prevent radio noise from leaking out. A small circuit board has the two 14-pin connectors (IN and OUT) mounted on it, and it connects to the 34-pin ribbon cable inside the drive.
I put a "tap" from the 34-pin ribbon cable inside the drive to the 34-pin ribbon cable running to my remote 5 1/4-inch disk drive. (See Figure 1) I then used a DB-40, 40-pin male and female clamp-on connector to clamp one side to the ST ribbon cable and the other side to the remote drive's cable. Then I plugged the two DB-40s together...and I had my signals. Quick and easy. (See Figure 2.)
You don't have to use a DB-40. Any clamp-on connector that covers the first 34 pins will work fine.
KINKY WIRING
And now, we have our disk lines... well, not quite. Atari does something kinky with the drive B select signal. It's on pin 6 of the DIN connector, when coming from the ST. But inside drive A it is switched from the IN connector pin 6, to the OUT connector pin 5, where it becomes the drive select for drive B.
This means Atari ST drives always listen on pin 5 for select, and the daisy chain scheme gives the proper drive the correct signal. Thus, the two connectors on the back of the ST drive are not interchangeable, like other Atari drives. Plug your ST into the OUT connector and the drive won't work, period.
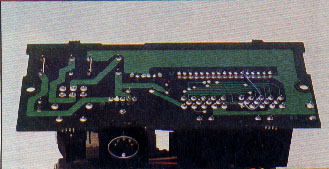
Therefore we have to jumper from pin 6 of the DIN connector (drive B select) to pin 12 of the ribbon cable (drive B select) to get this signal across. Otherwise it doesn't show up on the 34-pin cable otherwise. This is easy to do on the bottom of the 3 1/2-inch drive's DIN connector board. (See Figure 3.)
Now we need to set the remote drive as drive B. Sometimes it's called drive 1 or drive 2, depending on whether the manufacturer begins numbering drives at 0 or 1. Time out for a little theory. When a drive is idle, a five-volt signal (meaning HIGH) exists on the BUSY line. When the computer wants to access the drive, it "pulls down" this signal to zero (LOW). When the computer is finished with the drive, it releases the signal and the drive "pulls up" the signal to its original five volts. If two drives are hooked up, only one of them may contain pull up circuitry because the computer can only pull down five volts.
Pull-up circuitry is usually contained in a chip in the drive. And now you are at the point where you must know enough about your 5 1/4-inch drive to figure out where that chip is.
Since the ST drive A contains all the pull-up termination circuitry we need, we must remove any termination packs from the remote drive. In the case of my Tandon TM-100-2 drive I also needed to deal with the select line termination, since it doesn't go through the resistor pack. I had to clip out resistor R14 from my Tandon to get rid of the added termination.

Figure 3: on the bottom of the 3 1/2-inch drive's connector board, a blue jumper wire is soldered from pin 6 of the DIN connector to pin 12 of the ribbon connector.
Special Note: The ST monitor throws out a great deal of magnetism. If you don't keep your drive at least one foot from the monitor, the disk's heads will pick up the monitor's signals and confuse the read data. You'll immediately notice data errors if you get your drive too close to the monitor. This is a good reason to use a fairly long ribbon cable (3 feet or so) (We haven 't noticed this problem on our in-house development machine. Perhaps 5 1/4-inch drives are more vulnerable to magnetism. --ANTIC ED.)
ALL DONE
Alright, let's assume you have added an 80-track drive. Put the disk in, close the door and turn on the system. Click on drive B, select FORMAT, and format the disk either single-sided or double-sided.
From then on, treat the 80-track drive as an Atari ST drive. Note: 80 track drives have traditionally been persnickety, which is why 40-track drives remain popular. Keep a sharp eye on the drive's alignment. It takes very little misalignment to make a disk that only one 80-track drive in the whole world can read.
If you've added a 40-track drive, you may use it as an ST drive in only a limited fashion. You can't use FORMAT or a track copy, because they'll try to force the drive past its 40th track.
IBM ST
On the other hand, you can put an IBM PC disk in that 40-track drive, and click on the B icon. It'll pull up the disk's directoyy into folders and "text only" files.
You'll notice on the top of the window an PC-DOS type of "pathname" consisting of multiple (if needed) folders and a file name. GEM simply turns the concept of pathnames into folder icons and moves you through the path by your actions of selecting, opening, or closing a folder.
Of course, you can't run IBM programs because these are written in IBM assembly language, which the ST cannot understand. However, you can freely copy and use text files and the data within them. Furthermore, if you write from the ST to the PC disk, you'll find that an IBM has no trouble reading what you wrote.
It is a strange feeling for me to see that Atari has chosen IBM disk compatability. (On rumor claims this particular disk format is used by IBM's yet-to-be-seen PC II computer, which uses 3 1/2-inch disks). For so many years, the Atari system was utterly incompatible with anything else. Now the ST is PC data-compatible. Smart move. It is also very pleasant to be able to transfer data so quickly and easily.
David Small, a professional programmer and longtime Antic contributor, is currently developing ST software for Batteries Included. He and his wife Sandy are co-authors of "Guidebook: For Winning Adventurers," reviewed in the September, 1985 Antic.